How to Write the Perfect Bio for your Pinterest Account?

How to Write the Perfect Bio for your Pinterest Account?

The purpose of every introduction is to make an impact and a great first impression! You want people to notice and remember you. For Pinterest this introduction is your Bio. In this part of your profile, you can introduce yourself and your company.

When the visitors see your Pinterest Bio, they should instantly understand who you are and what you do. It only takes a few seconds to make a first impression. In those seconds the user will decide whether to follow you or not. You should maximize this time to stand out.

Today we are going to share with you a few methods you need, to create the perfect Pinterest Bio to attract more followers, get more repins and drive more traffics to your website.

1.Profile photo or logo

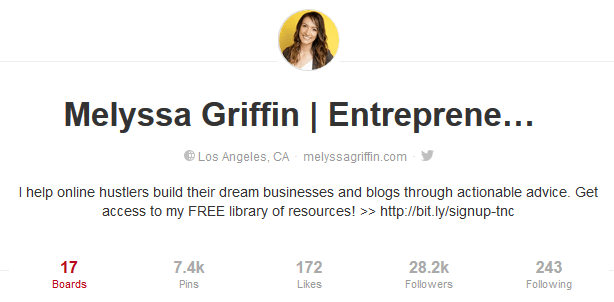
Your profile picture is the face of your brand on Pinterest. It is the very first thing people notice when they visit your Pinterest profile, so it should make a good impression.If you have the account exclusively for your business or you are selling a product on Pinterest, you can use your brand’s logo as your profile picture.If you are a blogger, you should get more creative! Composition and color are essential. Your picture should not be a bathroom selfie! Have the crisp, bright color that will make you shine! Because it reflects who you are and what you are writing about.

2. Personal name, brand or business name

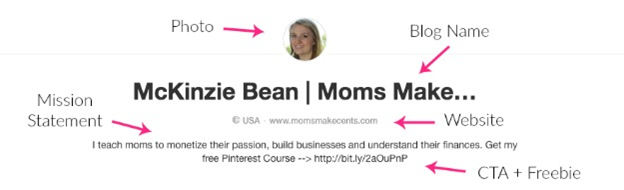
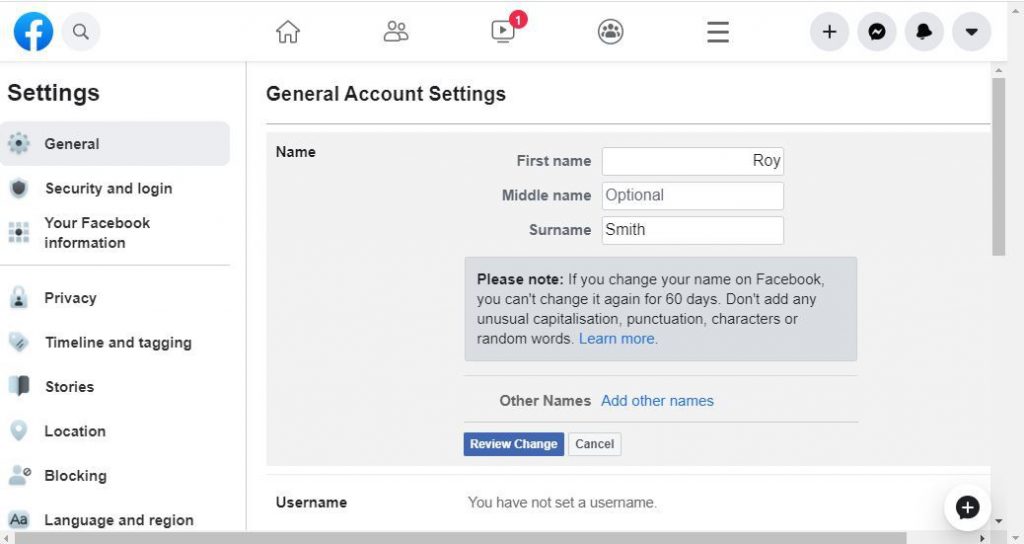
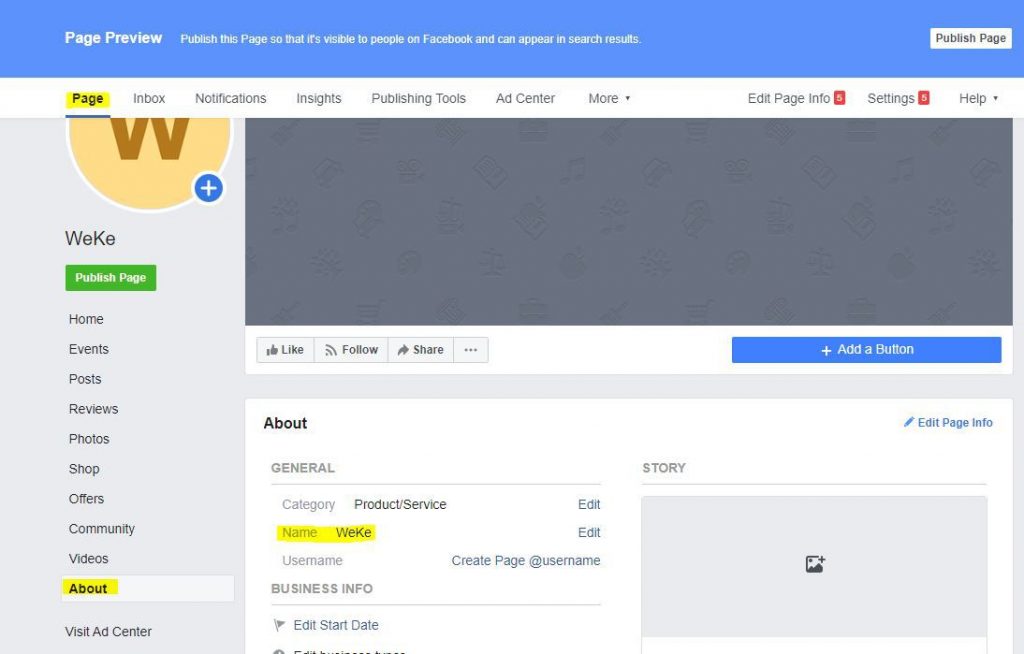
F you have changed your account to a business account, you can list your brand’s name instead of first and last names. Make sure it is the complete name of your business and grabs people’s attention.

If you are a blogger, write your name followed by an underline and then your industry related keywords or your blog name. Try to use SEO friendly keywords to be more visible to people searching for a specific topic.

3. Keep it short and sweet

The text is essential in writing bios, but remember when people visit your Pinterest profile, they are looking for more visual interaction than text! Just start with your personal or brand’s name, then mention the most important parts of your brand or business, but don’t overdo it. A couple of sentences are just enough for your Bio.

4. Writing your Pinterest bio

The platform only allows you to use 160 characters for your Bio. Don’t try too hard to be unique, just be yourself and you will succeed. https://www.whisperingcreekdentistry.com/ Try to convey your message to your audience as clearly and naturally as possible. Keywords are more critical in Pinterest; this is the way you can show up on searches.

5. Link your website

You should link your website to your Pinterest account. This way you can direct pinners to your website to get more sales, page views and subscribers.

6. Add your other social media accounts

You can link your twitter for instance, so that people can quickly follow you and get daily updates from you on twitter.

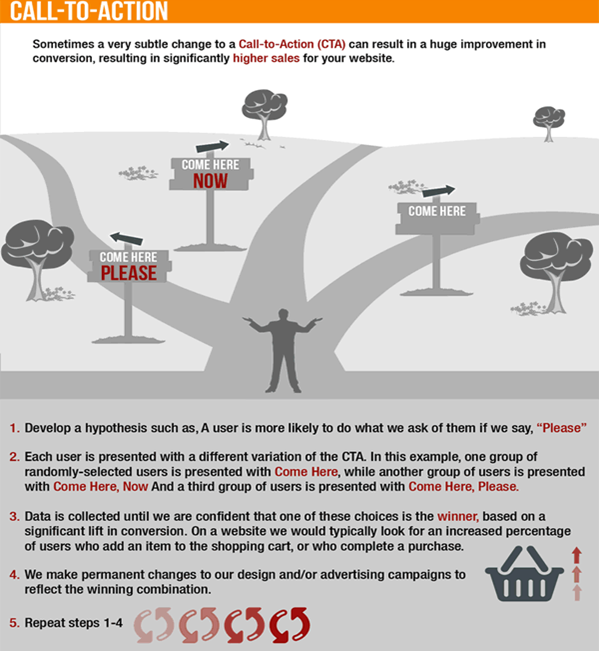
7. Add a call-to-action (CTA)

You can add a call-to-action (CTA) to a targeted place on your site to direct people to your online shop or a page that you need more traffic for. It can help convert regular visitors to loyal customers.

8. Include your location

Add your location to get help with your local SEO and make better social connections. Don’t write your whole home address, dear, just including your country or state would be enough.

You can easily create a complete Pinterest Bio with these steps.

Let your mind and creativity flow and focus on building your brand as you develop your Pinterest page.

What is Pinterest bio character limit?

Like other social media, Pinterest has its own limit of characters for the different types of text. Like bio, brand name, etc. here is the summary of Pinterest bio character limit.

Pinterest Profile Name: 20 Characters with space

Pinterest Bio: 160 Characters with space

Pinterest Username: 15 Characters with space

Pinterest Board Name: 100 Characters with space

As you see, you can write about 160 characters in Pinterest bio, which is about three lines.

Remember, that the bio is the first thing people would see about you. So, you should include the most amazing things about you or your highest achievement. Or even your goal from creating a Pinterest account.

All of this would help users to stay in your profile, and click more on your posts. The more you increase the impressions, the more you will get benefits from your Pinterest account.

You can also include some quotes about your life, or add your business vision in Pinterest bio. All help users to find who you are. There should also be some tools to change the font of Pinterest bio if you prefer something different.

Conclusion

Having an amazing and eye-catching Pinterest bio is necessary to get more traffic and clicks. If you link your website to the Pinterest posts you can many referral traffic which can become your future customers.

How to hide online status on Facebook?

People can choose their activity status on social media. It is part of everyone’s privacy to select who can see them online and who don’t have to see them active. However, it is not an option on some of the social media, but Facebook as one of the top social media has made this option for its users.

Woman showing a Facebook icon

How to hide online status on Facebook?

It might have happened for you that you wanted to hide online status on Facebook. Though, you can hide online status either for your entire contact list or for the specific persons/list. So, there are three options for you: hide online status for contacts, a list you have already made, or particular persons.

  • If you want to hide online status for all contacts, you should open your Facebook, on the right side you can see the chat Option. Click on the chat Option, and click on Turn Off Active Status. It opens a window for you, click on the first option. Turn off Active Status for All Contacts.
  • If you want to hide online status for only some friends, you should create a list first. To create a list, you should go to the Facebook home page. On the left side, you see a list. Click on the Friend Lists, if you don’t see it, click on the see more, the lists would expand. Once you click on the friend lists, you can see different listings of friends, to create a new list click on the Create List and type the name of friends you want to add.
  • Now, to hide online status for only some contacts, go again to the Facebook homepage, click on the chat option on the right side. Click on Turn Off Active Status; a menu would open for you. Click on the last option “Turn off active status for only some contacts.” In this part, you can type in the name of specific persons, or you can type in the name of the list you had created. Both of them works. You can even type in the name of a friend list and some of the friends there, once you click on Okay your online status would be hidden for those you have selected.

However, once you hide your activity status, you also won’t be able to see that person online status, and it automatically turns off for you too. To unhide online status, you go to the chat setting, click on the Turn Off Active Status and remove the names from the menu.

How to hide online status on Facebook mobile?

If you are using your smart phone, and you want to turn the status off, unfortunately there is no option on Facebook mobile to turn the online status off. Instead, you should go to the Facebook messenger, and turn the online status off from there, or you back to the Facebook on desktop and change the setting there only.

Whatever your setting is on the Facebook desktop, it will be on the Facebook mobile app too. For example, if you have changed the status online for some of the contacts you have, your online status will not be shown when you are using the mobile app, or even the messenger.

So, if you want to do some basic changes, you should follow the first section in this blog. To turn the active status on or off for the short period, you can read the following.

How to hide online status on Facebook messenger ?

Turning off the activity status on Facebook is easy, and with a few clicks you can turn it off.

To turn off the activity status off on Facebook messenger:

  1. Open Facebook messenger or Facebook mobile app
  2. Login to your account and you would see the home page (if you login with Facebook mobile app)
  3. From home, you should see the messenger icon (you should have installed it on mobile). Tap on messenger icon

4. Tap on your profile picture on top left of messenger app

5. You can see the setting menu, tap on active status and right from there you should the status is on or off.

6. Tap on the button to switch the active status off

7. Confirm the action by tapping on “Turn Off” and it will stop showing you are online

Facebook active status keeps turning on by itself

It might happen for you to see that online Facebook status keeps turning on, and even you turn it off after a while, you see that it goes back to the online status. It is annoying once you want to hide your active status there. However, it is not Facebook bugs, and there are some reasons why Facebook keeps turning on online status.

Reasons why Facebook status keeps turning on and how to fix:

  • Once Facebook app or messenger updates the online status will reset, and it backs to the default (online status).
  • You should turn the status off on the Facebook app or Facebook desktop, as it is explained above.

Go to the phone setting and turn off the automatic update apps. So, Facebook and messenger apps won’t update automatically.

How accurate is active now on Facebook?

It might happen for you to message someone on Facebook, and you get no reply from them at all. You think they are online, and after a few minutes, you say they go offline without replying to your message. If you later on, ask your friends, they say that they were not online! Yes. Online status on Facebook is not accurate, and it depends on many things.

If you want to be offline, you better:

  • Log out of your account on the desktop
  • Close the Facebook app, or log out
  • Turn off active status on messenger (because you cannot log out of messenger) or close the app on the phone. If you keep the app open, it might show your status online fro friends.

All in all

Facebook has fewer bugs compared to Instagram, but if you stuck somewhere using Facebook, you could quickly fix it. Please note that to turn active status off, you should do for all messenger, Facebook app, and Facebook on desktop.

What is the best value online store builder?

With the ever-increasing trend of online shopping of users and ease of choice and access to any products globally, building an online store is necessary. Now, every retailer or small business need

Thanks to technology. Now, some websites let you build your website quickly and sell online with a price of coffee. If you have just started your selling or even, you have the experience, but you prefer to save your money. If you are wondering how eCommerce website builder works or how it might help you grow, read this article. 

What is eCommerce store builder?

An eCommerce store or online store builder is a website that gives the ready themes to make a shop online. However, an online store builder provides all other things like host, domain, for you, and all you need is to customize your eCommerce website. You can add any products on the site, and get your unique link to share everywhere.

You can also have your method of payment and add it to your online store. eCommerce store builder makes it easy for all retailers or small businesses to make brochures ready from the web within a few hours, with no coding or technical knowledge.

The great advantage of building an online store is that you can show the products more efficiently and faster. They can find what they need, through hundreds of products, while you have no competitors.

Best value eCommerce store builder

If you have any products (services, physical, digital), you can sell them by making a collection on your website. But the most critical question is once you make your online website from where your customers would come? Your customers come from anywhere you share your iLink shop or Google search engine. 

iLink

iLink is an eCommerce website builder platform which has ready themes and customizable design to set up an online store in the fastest time. The iLink is also providing the landing page builder, on which you can add all multiple links, share your unique iLink URL in any places you want (there are audiences). Visitors can sort out the products by different factors, including price, popularity, newest products, categories).

So, it made it easy for customers to choose between hundreds of products, which is difficult on the Instagram feed itself.

How can you use the iLink shop?

  • Find customers by inserting iShop link in your Instagram bio and all your social media (wherever is possible), and the user would visit that place. 
  • iShop is designed to bring customers from Google search engines too. So, you can get a higher chance by adding a full description for each product, and once people search on Google, they can find yours. 

Seven advantages of using iLink shop

iLink shop is easy to set up just with few clicks, and it is affordable. You can match the theme with your brand and make it unique and attractive. 

1.Set it up easily

iShop from ilink is easy to set up. All you need is having your products and their price. You can quickly sign up to ilink and right from your dashboard, build your online store. You can start with any number of products, even less than ten items. All of the necessary pieces of an online store is in iShop, including categorizing option, different price options, live preview, etc. 

2. Customize your store

Uniqueness is now the key to success. By making iShop, a unique landing page, attract more customers. You can match it with your social media feeds and logo.

3. Lowest price 

with a price of coffee, you can own an online store. There are indeed many more store builders, but iLink gives you high quality with the lowest price to grow and expand your business. iLink store builder makes you an online store, sharable on any social media or places you have an audience.

4. Add Unlimited products on iLink

some of the services have a high price for the limited number of products, but iLink gives you a chance to add as many products as you want to your online shop. 

5. Choose different payment method  

iLink has considered different payment methods. For example, you can put an option for customers to contact you if you see it is necessary or put your payment link like PayPal. 

6. Add all your social media on the online store  

there is a place for you to combine all social media on your page. Nowadays, people search for brand social media before the purchase decision. So, it is an excellent chance to connect all customers through your Instagram, Facebook, Twitter, etc. 

7. No technical knowledge required

 It might seem very difficult or confusing at first, but iLink has already done all the tasks and prepared templates for you. You only need to add your products, that’s it! 

iLink online store builder

Here is the picture of the iLink online brochure of your products. Now, you can add the link in your Instagram bio, and once users visit your profile, they can see your store. But what are the main points of using iShop in your Instagram bio?

On the iShop online store:

  • Customers from Instagram can sort out the products by popularity (though, they cannot do it on Instagram feed)
  • They can see all products in different categories
  • Old products can be seen
  • They can sort the products out by price
  • They can see the detailed descriptions of a products

So, the iLink would be the best option to facilitate user experience on Instagram. This is the best value online store builder available on the market in which you can add any products with your payment links.

All in all

iLink is the best online store that is well worth it. with paying about $7 per month, you create an online brochure with the links to pay online. iLink will give you a free landing page to include all your other URLs too. Through iLink statistics, you can get valuable insight to know what products requires the the market.

How to make a playlist on YouTube?

If you are using YouTube in your everyday life, you might need to know more about its features. For example, you can make a playlist on YouTube and add what you like there. There are some other options on YouTube that are useful. In this blog, I would explain how to make a playlist, adding, or removing videos to it.

YouTube is the biggest video sharing platform, and of course, it has lots of benefits for its users. If you are working on your website or online store traffic, YouTube is of great help to get more leads and traffic.

How to make a YouTube playlist?

You can create a playlist on YouTube and make it unlisted, public, or private. If you make your playlist unlisted, no one will be able to see it unless you share the link. The private YouTube playlist is visible only for you.

To make a YouTube playlist on mobile:

  1. Open YouTube app
  2. Login to your account
  3. On the home page tap on the search icon
  4. Open the video you are going to add it to the playlist
  5. Tap on save (it should show a saved blue icon)
  6. Tap on change (if you have not got the playlist already)
  7. Tap on create
  8. Type in the name of the playlist and set the privacy

You should see that your video is added to that playlist. Please notice you can create a playlist separately from the library section.

To create the new playlist:

  • Open YouTube app
  • Tap on library
  • Select New playlist
  • Find the video and tap on three dots icon on the right side of the video
  • Select Remove from “name.”

To remove a video from a YouTube playlist:

  • Open YouTube app
  • Tap on library
  • You should see the name of playlist your videos are in it
  • Find the video and tap on three dots icon on the right side of the video
  • Select Remove from “the playlist name”.

Done!

How to delete a playlist?

If you delete a playlist, you cannot undo the action. So, make sure you have a backup from the list, or you no longer the list.

To delete a playlist on YouTube:

  1. Open YouTube app
  2. Tap on library
  3. Scroll down to find the playlist you are going to delete
  4. Open the playlist
  5. Tap on the recycle bin icon just under the playlist thumbnail
  6. Confirm the deletion

You can edit the playlist by tapping the three-dot icons beside each video listed under the playlist name. If you tap on the pen icon beside the playlist thumbnail, you can change the name and privacy.

All in all

Making a playlist on YouTube can help your channel visitors find the videos better and faster. This action will remarkably enhance the videos’ views. So, I would highly recommend you categorise your videos and put them all in their related playlist.

How to change your YouTube name?

YouTube is the biggest video sharing platform that has recently become like social media with its new features. New opportunities like YouTube stories, live videos, and all other features make YouTube an inevitable part of everyone’s life.

YouTube provides excellent opportunities for people to boost their business, make money, or express themselves. Now, every subscriber on YouTube worth dollars, and it is becoming a challenge for YouTubers to get fans there.

Having a video on the first page of YouTube among millions of shared videos daily is not easy, and it is a real challenge. There are also lots of tools available on the internet to help users grow their Account; for example, using iStore, you can build and share your online store catalog on YouTube (in the description link is allowed).

However, sometimes YouTube gets confusing, and you might need further articles to know how does its parts work. For example, changing names in different parts of the YouTube account or YouTube channel.

How to change your youtube channel name?

If you are running a youtube channel or you have had a youtube account, you can change the name easily with a few clicks. Follow the instruction to see how to change it. I first start with changing a youtube channel name.

Notice if you have created the youtube account with your Gmail. Therefore the name and all other data come from the Gmail account. So, to change the name (if you have logged in through Google account), you should change the google account setting.

To change the YouTube channel name on the desktop:

  1. Go to YouTube on desktop
  2. Login to your account
  3. Click on your profile picture on top right
  4. Click on Setting
  5. Choose Account in the left menu
  6. Find Your YouTube channel section
  7. Click on Edit on Google (besides the name of channel)
  8. Write the Name and Surname you want
  9. Click on Save

To change the channel name on the YouTube app:

The process of changing the name on the app is not the same as changing the name on the desktop. On the youtube app, you should directly go to the channel, and from there, you can change the name. Follow the steps below.

To change the name on the app:

  1. Open YouTube app
  2. Login to your Account
  3. Tap on your profile picture on top right
  4. Tap on Your channel
  5. Tap on the edit icon beside the name
  6. Write the new name

Done

All in all

You should notice that you cannot change the name more than three times in 90 days. Therefore, before turning the name, select it carefully, because you should wait almost three months to change it again.

How to Add WhatsApp Link to Instagram Bio?

WhatsApp is a free popular messaging app owned by Facebook. Using the Internet, you can send text messages, photos, audio files, and videos in private and group chats. Due to its widespread use, many users seek to put a direct link to their WhatsApp on social media platforms, including Instagram.

We’ve put together four simple ways to insert a link from Instagram profile to WhatsApp chat:

How to create a WhatsApp link?

If you want to share your WhatsApp ID or link without sharing a phone number, you should create a link. Generally, there are two ways to develop and cope with the link.

  1. You can create it manually by adding your number at the end of the wa.me/
  2. Create a WhatsApp link with pre-filled message

Examples:

Use: https://wa.me/1XXXXXXXXXX

Don’t use: https://wa.me/+001-(XXX)XXXXXXX

To create a pre-filled message, you should write your text in something like a code format:

For example, I’m%20looking%20forward%20to%20meeting%20you%20soon

Then, add the code in the URL as follow instead of TEXT:

https://wa.me/?text=TEXT

For example: https://wa.me/?text=I’m%20looking%20forward%20to%20meeting%20you%20soon

Create WhatsApp link manually using iLink account

In the 9th step of the 3rd method, it was mentioned that you could add links without limitation on their numbers. So, whether you already have an iLink account or are in step 9 of making a new account, you can type the WhatsApp link manually. It will be something like this: “https://wa.me/123456789012” or “https://api.WhatsApp.com/send?phone=123456789012”. The phone number at the end is written in an international format without zeros, dashes, or “+” sign.

If you know about other creative ways to add WhatsApp link to the Instagram story, feel free to share them with us in the below comments.

How to add WhatsApp link to Instagram bio?

Use WhatsApp link in the Instagram bio

As you may know, you are allowed to have only one unique clickable link in the Instagram bio. To add this link, go to “Edit Profile” and in the “Website” section, put the direct link to WhatsApp chat that looks like this: https://wa.me/123456789012-the phone number should be without the “+” sign and the zero numbers “’00” with the country code at the beginning. The steps are shown below, and finally, the link in your bio will be like the 4th photo.

This approach is practical, yet it has two main problems. The first is that many users do not want to put their direct WhatsApp’s click to chat on their Instagram bio since it’s not typical to show your mobile number clearly. Visitors see your private number at first glance when they come into your Instagram profile.

Another problem with putting WhatsApp’s link on bio is related to Instagram’s limitation on the number of clickable links in bio. If you spend the single link on WhatsApp, what are you going to do with other URLs? Stay tuned to find the solution.

Use WhatsApp link in Instagram story highlight

This option is available for Instagram business accounts, which are verified or have more than 10,000 followers. Instagram doesn’t allow others to put a clickable link in stories.

Follow below steps to put click-to-chat WhatsApp link in a story and highlight it on your Instagram profile:

1. Find and download the WhatsApp logo. Then, save it in the picture gallery.

2. Open the Instagram app on the mobile phone. On the Instagram feed, tap “Your Story” at the upper left.

3. Tap the photo appearing on the bottom left and choose the downloaded WhatsApp logo from the gallery.

4. Click on the chain icon. In the new window, type WhatsApp link as “https://api.WhatsApp.com/send?phone=123456789012” or “https://wa.me/123456789012.” The last digits represent the phone number in international format. As you see, it should be written with any zeros or “+” sign, brackets or dashes. Tap the “tick” button to upload the story.

5.Then, go to the story highlight it so that it will be shown permanently in your profile.

Create a WhatsApp icon using iLink tool

With iLink, you can choose your username and create a single URL that leads you or visitors to a page containing all your relevant links, including WhatsApp link. Follow the below steps to learn how:

1. Go to https://il.ink

2. Click “Login” on the top-right of the screen. Then, click “Sign up Instead,” as shown below.

3. Choose a desired username on your own and fill in “Username,” “Email”, “Password”, “Repeat Password,” and tick the “I’m not a robot” box. Then, tap “Sign Up”.

4. Choose one of the default avatars as your iLink profile photo or upload one from your device. Then, choose a name.

5.Click on “Add more info” and below form appears. Tap on WhatsApp icon.

6.Enter your phone number in international format after the default text of ‘Whatsapp.com/’. Omit any zeroes, brackets, dashes or “+” sign and “zeros” at the beginning of the phone number. It should be something like 123456789012.

7.Choose a design or skip this stage to do it at a later time. Tap “Submit”.

8.Add links here or skip.

9.Your iLink profile is ready! iLink profiles vary depending on your chosen design, the links or the social icons you choose. It will look like below. When users click on WhatsApp icon, they can instantly chat with you.

Note: If you didn’t manage to do the above steps (except for the “Name” field), you could complete your profile later by signing into your account again. It means you can add WhatsApp link in the “Identify” tab in iLink panel then.

Using this approach, you are in fact getting around Instagram’s limitation on the number of clickable links in bio. Feel free to add as many links as you want to your iLink page and share the created single URL on your Instagram bio as shown below.

All in all

Using WhatsApp link on Instagram can be of great help to lead more users to your WhatsApp. If you are running a business, you can make great support by sharing WhatsApp linkswith customers.

How to delete a YouTube channel?

YouTube is now the biggest and the best video sharing platform all around the globe. However, having multiple channels might be time-consuming, and for any reason, you might need to delete some of them. In this blog, we will explain how to remove a YouTube channel step by step.

YouTube is now of the worthiest and most prominent platforms for all kinds of users, including personal, business, with many categories. People can make money on YouTube by only sharing their fun videos. Or even sharing the iLink URL on YouTube channel can help you to lead more traffic to your shops, or landing page.

How to delete a YouTube channel?

If you have already created a channel on YouTube, you can delete it anytime. However, there are many ways to remove a YouTube channel. For example, the device you use, or if you can log in to your account or not. Please keep in mind that you should log in to your account to access the YouTube deletion link.

You cannot delete YouTube channels on a mobile phone, and you must use a desktop to remove a YouTube channel.

To delete a channel:

  1. Go to YouTube website
  2. Login to your account (you can log in via Google account too)
  3. Click on your profile picture
  4. Click on Setting
  5. On the left menu, click on Advanced setting
  6. Scroll down until you find the Delete channel
  7. Click on Delete channel
  8. Enter the login info again
  9. Choose I want to permanently delete my account
  10. Accept that your data will be deleted (the number of videos, playlist, subscriptions, and all other data).
  11. Click on Delete my content
  12. Confirm the deletion by typing in in the email address

Once you confirm, it will be sent to the deletion process. If you have a lot of content, it takes up too few days. The deletion depends on the amount of data you have on YouTube; it may take from few minutes to few days.

How to delete a YouTube channel without login in?

If you have lost your password, or you cannot access your Gmail account (due to lost phone number or any other reason), unfortunately, you cannot delete the channel. The only way to remove your channel if you have no access to your phone is to retrieve the YouTube account. If you search the internet, there are lots of articles saying how to recover the YouTube account.

How to delete a YouTube channel on your phone?

Unfortunately, you have no access to the YouTube deletion on the phone, unless you switch to the desktop version on your browser. Even if you open YouTube on a browser, it will automatically redirect you to the YouTube app, which cannot be deleted on Android devices.

If you have not got the YouTube app on your phone, then you can use a browser to access the YouTube channel. From there, you can delete the channel.

Therefore, to delete the YouTube channel on the phone:

  1. Open any browser,
  2. type in the YouTube address,
  3. login to your account
  4. on the setting switch the view to the desktop version
  5. follow the steps in the previous sections (Setting>Advanced settings>Delete channel)

What is a Landing Page and How to Drive more Traffic to it?

Yes, paid media can boost your landing page traffic, but at what cost? Some businesses like insurance and legal services historically experience very high keyword bids.

Of course, spending money on clicks like this doesn’t translate to sales most of the times. Instead, there are many productive ways to gain free landing page traffic, and ultimately conversions.

To get what you want from your landing pages, you need to be more optimal. And to make your landing page optimal, you need to refine and improve your performances continually.

What is a landing page?

A landing page is a web page that lead users from different places to it. It can be consisting of different links, or call to actions. A landing page can be a mix of social media links, important URLs, as well as purchase links of any products.

A landing page has only one purpose: to gather information from a visitor by using a form. Every piece of information on the webpage should encourage visitors to fill out the form.

You may have many sections on your website with forms to collect data, but unless that section has no other functions, it isn’t considered a landing page. A useful landing page will present information about an individual offer and lead the visitor to the form to take action.

How to create a landing page?

Making a landing page is easy and you no need any technical knowledge or coding. All you need to make a landing page having a picture for your profile, your social media links, and all the URLs you are going to include. To register to a landing page builder website, you must have an email address, that you have access to.

 How to make a landing page?

  1. Prepare your profile picture and URLs
  2. Go to iLink and register by giving your email address
  3. Go to the dashboard and click on add URL
  4. Paste the URL you want one by one and change their design if you want
  5. Add your social media in the info section
  6. Add the profile picture or change it in the info section
  7. Check the preview on the right side of the dashboard
  8. Copy the iLink username on top left of the dashboard
  9. Insert the link on social media, or share it anywhere you can

Landing page builders

iLink is one of the best platform to make a landing page. the way it works, is that you register to the iLink with an email address. Once you register, and enter the basic info you will be entered to the dashboard. On the iLink dashboard you can build your landing page, by adding all the social media (Facebook, Instagram, Pinterest, medium, YouTube, Tumblr, and so on), and your URLs.

These URLs can be your purchase links, your different contact links, or any other place you are going to lead people. Indeed, a landing page is where people are lead. iLink has two main services, first is making a landing page. Second service is to make an online store. Which is similar to a landing page, but you can add all purchase links to it.

Landing page benefits

Landing pages are beneficial because they give each of your content offers a place to stay, making it simpler to funnel customers more efficiently. For instance, suppose you provide a free PDF about different sorts of decking materials, and you also give free consultations for refinishing.

Having separate landing pages for each presentation will let you funnel visitors from a blog post about keeping a cedar deck to your free consultation, and an article about the advantages of composite decking to your eBook on materials.

How to drive more traffic to your landing page?

Let ‘s say you own a bunch of landing pages that are waiting to generate some leads. How do you get more visitors? Here some helpful techniques.

1. Calls to action

· On your blogs

Instead of putting a form on a busy homepage, you should use a call to action that leads to one of your best products, this way you can quickly steer new customers right to the goal.

A call to action that leads to a relevant offer should be on each of your blog posts. If you have quality content on your site, you can create personalized calls to action on your blogs and cycle through depending on who your visitor is.

· On popular pages

Whether it is a blog post, an article or an educational page on your website, these pages are already getting lots of hits. Make them more efficient by placing a call to action to a related offer and turning some of those viewers into qualified leads.

2. Email marketing

If you are sending out emails to your current customers, make sure you are directing traffic from those emails to your targeted landing page and not your home page. These visitors are already qualified, so they don’t need persuasion to convert. You can even send your blog posts with calls to action that are precisely targeted to an individual, to make them more likely to click through.

3. Facebook landing pages

Facebook landing pages help you funnel your social media audience back to your website and offers. When you present a proposal on Facebook, instead of leading visitors to your home page, send them to a targeted landing page to achieve the lead.

4. Social media sharing

Share your product with a link to your landing page to all of your fans, friends, and followers. If your product is good enough, some of your audience will share it, and it will help increase your reach even further. While it can be tempting to post to every social media platform every time, take some time to find out what products are most suitable for a specific platform’s audience, which can really increase leads and engagement.

What Are the Benefits of Social Media for Individuals?

Social media is becoming one of the basic needs in today’s world, so It is essential for every single person o matter from which industry they belong, they should use social media.

The benefits of social media

Now, social media not only is used for personal purposes but also for all business. Specially, for small and medium sized business. you can even use social media to earn money. Having fans and followers on each social media is worthy. For example, one with one million followers on Instagram can earn more than $100K per posts. Now, Instagrammers use their accounts to sell their products, or even advertising.

  • Social relations

Social media platforms are a great place to keep in touch with other human beings!

  • You can meet new people from all over the world
  • connect with your family and friends
  • improve your relationship with your colleagues
  • build a stronger relationship with your clients
  • find your old friends from high school and keep in touch with them.

A platform like Instagram and Facebook is mostly used for social networking all over the world. A lot of people are connecting to each other via these social media platforms. Because they provide information about other people’s likes and interests, so you will get to know them better and faster than the real world.

  • Marketing:

Social media like Facebook, Instagram, Pinterest, YouTube are the best places to market any products. Almost all of them, are having a place to insert the URL of your website. Even if you have not any websites, you can build a landing page on iLink and share the URL on any social media.

We do have many tutorials on how to add your social media link into your social media account like Facebook and Instagram.

The more you have followers and fans, the more you get the website clicks. If you sell any products on your landing page, or online store then you can earn money through social media.

Even social media can be used to advertise any products, or posts. Advertising on social media like Instagram can be done in two different ways. First, you can pay and use Instagram advertising services.

  • Education

You can use social media for learning too. Social media has proven to have a lot of benefits for the teachers and students. You can learn from others who are professionals and experts in your field via social media. It doesn’t matter where you are; you can connect with anyone anywhere and learn from them.

  • Get help

You can share your problems with other people across the world and get their help and opinions on your issue. Whether it is helping with money or you just want advice. If you search on Reddit you can find many communities helping users to answer their questions.

Even there are social media like Quora specifically designed to answer users’ questions. Following tags, hashtags, different communities, groups and so on help people to find their answers faster than ever.

  • Updates and information

The main benefit of social media is that you can get updates about the latest happenings around the world. If you want to get more news on the social media, you can follow some news related accounts. Instagram algorithm will realize that you are interested in those topics, and will show you more of it.

If you go to the explore part of Instagram, you can see the top news, or news in the categories you are interested.

  • Promotion

If you are a business owner, you can promote your brand and products by using social media. The whole world can see your brand on the internet, and you can boost your business in no time! you can promote the products that you have shown on a posts by Facebook or Instagram advertising. You can even advertise on YouTube. The cost of advertising would be based on the users clicks. You can set the advertising by any budget you have, and customize the place, age rage, interests and so on.

  • Good cause

You can use social media for noble purposes like promoting an NGO, welfare activities and donations for charity.

  • Helps agencies fight crime

The other benefit of using social media is that they help governments and security agencies to find and catch the criminals to fight crime. It is not recently, that Facebook added Safety Check. So, at the time of crisis like earthquake or so on you can check safe and your friends will be notifying that you are safe there.

This is also through for all other crisis, for example Instagram with introducing stickers about the Coronavirus alarm millions of people to stay at home to be safe. Governments uses social media to inform people about different strategies. Facebook, and Instagram and so many other social media are directly connected to the World Health Organization (WHO) to give the right information to users.

  • Accessibility

You can connect anytime you want, before, after or during networking events. People can know you before they actually meet you in person. If you want to have specific circle of friends on social media, you should know more about their algorithm. For example, Facebook uses your information like place of living, education, or workplace to suggest your profile to others. and also to suggest others to you.

Therefore, if you want to have more local friends rather than international ones, you should accept more friends near you. based on the mutual friends Facebook would find people near you and would introduce them to you.

  • General fun and entertainment

A lot of people use social media when they want to catch a break at work or just want to relax at home.

  • Global natural disaster news support

A lot of people use social media when they want to catch a break at work or just want to relax at home. If you search on Instagram search bar, you can see lots of tags, or account that working on fund videos. Though, some social media like TikTok stays at the top of entertaining category. Even on Instagram sharing TikTok videos is fun, and you would find lots of accounts with hundreds of followers just reposting fun memes of TikTokers.

  • Encourages unity amongst all people

Social media is a great way to unite the people around the world, no matter the nationality, race, gender, culture, age, shape or size. Social media has created a new culture of acceptance and anti-prejudice, and we love it!

How to change your name on Facebook?

Facebook is now the first social networking app all around the globe. Having a Facebook page is of great advantages and benefits for a person, or even all businesses. Though, Facebook is getting complicated and you might need help to change some parts in your Instagram page including the name.

Working with Facebook page is not easy, and when you first open the page you might get confused. Without, knowing where are the different parts you might not able to change or do some actions on Facebook.

How to change name of Facebook on mobile & desktop?

If you are going to grow your Facebook account or use this social network for your business like setting up the online store with iStore, so it is better to have a great understanding of different. You might also use all tips and tricks to grow your account and perform better on it.

Before changing the name of Facebook, you should remember that Facebook does not allow you to change the name frequently. This is the same for Instagram. Now, these social networks allow you only twice in 14 days, to change the name.

So, you should choose the name first, and make sure you are not going to change it. Facebook may prevent you from changing the name more than twice in a specific time period.

To change the name on Facebook app

  1. Open the Facebook app and login to your account first. Once you open the Facebook app, you should see the home page in front of you.
  2. Tap on the burger icon on the bottom right of the home page
  3. Scroll down to see the setting & privacy > Setting
  4. Tap on personal information
  5. Tap on name and write the name you want
  6. Review the changes and see if you need to alternate the name
  7. Save the changes!

Please Note: As it is written on the Facebook app too, if you change the name you won’t be able to change it for 60 days (2 months). so, try to change it carefully.

How to change the Facebook name on desktop?

  1. Open the Facebook on desktop
  2. Click on a small triangular icon on top right of your page
  3. Find privacy and setting, and click on it
  4. Click on setting
  5. You should see the general section in front of you (if not, on the left menu, find the general, and open it)
  6. Type in the name you want and review the changes
  7. Save the changes

How to change the name of Facebook page?

Changing the Facebook page name is easy, and it is almost the same as changing the Facebook personal account name.

  1. Open Facebook on a browser
  2. Click on triangular icon on top right to access the pages
  3. Go to pages
  4. Click on the page you are going to edit it
  5. On the left menu, scroll down, click on see more to find About
  6. Open about and go to general section
  7. Right there you should see the name and username bar
  8. Write in the new name and review the changes
  9. Save the change!

How to make money on social media (Facebook, Instagram, YouTube)?

Now, social media is the best platform to make money, and you should never lose this chance. I highly recommend you create your Facebook page today, open a business Instagram account, and have a YouTube channel. Create a landing page (with links to your products), or even an online store and share the URL in the website section of Facebook, YouTube (in the description), and Instagram.

How to make money on Facebook, Instagram?

Facebook is very popular, and as it has millions on visitors daily, so it is one of the best platforms to make money. I believe whatever you sell, or whatever your products are, you can make an online brochure and make an online store first. 

Then share the online store on Facebook. As you know, the Facebook description is recognized by a google search engine, and many users might reach to your products by searching on google. 

iLink is also SEO friendly, and your products can be discovered by those who search on google. 

There are some points you should know before making money on Facebook: 

  • Your products: if you have any ideas to produce your products (physical, digital, service), that’s cool. If not, I suggest you go for handicrafts (if you are interested in), or you search for any affiliate programs. You can also find some whole sellers and, with a few investments, get physical products at a lower price. 
  • Then, you can seel them with their actual price. If you still don’t know or you have nothing to investment, affiliate programs are good to start. They no need you to spend anything; instead of finding customers, you would get commissions. 
  • You can use Facebook as a platform to sell that product. In the next tips, I would mention some tips to get more users on Facebook. 
  • Facebook ads are an excellent place to start if you still find them expensive (as they cost per click), you can talk with some of the bloggers and influencers to introduce your Facebook page. So, you can make lots of fans and sell your products on Facebook. Don’t forget to invest based on your budget. 
  • If you don’t want to spend anything on advertising, blogging platforms like Medium are an excellent place to start. However, you should know some more about keyword searches to get more traffic from google. 
  • If you are active on Medium, and you see that medium users can use your products (ebooks), you can advertise for them. However, you should be careful, as Medium is against advertising stuff. You might get blocked by them. 

Having a Facebook page and an Instagram business account is a must for you. So, go and follow the step by step guides to make a Facebook page, or switch the personal account to a business on Instagram. Take your time to create a cover photo, and fill up all the information needed on the Facebook page. 

In the website section of the Facebook page, you can use your ilink landing page. So, you need to go to ilink, make a website, or online store, insert the link in the Facebook page website section. 

Users who visit your page will visit the landing page and online brochure too. 

You can have a great collection like a pro there and share one by one on the Facebook page. 

Other techniques to get more fans and followers are running a campaign. It would help if you invited friends, or everyone (make sure your posts are public so that others can see it). 

The condition of the campaign is following your page, like your posts, then you would announce the winner. Pick a winner randomly and give them a price. 

Running a campaign is now one of the best ways to attract more visitors to your website. 

You can also find some other campaigns if you search the web, and you can participate as a response. 

How to make money on YouTube?

The underlying process of making money on youtube is almost the same as Facebook, and Instagram, so you should take your time to fill up the description part of a youtube video. 

Make sure you use all 5000 characters that help users find your videos. To start, you can use some apps or online tools to make videos about your products or any questions that could be related to your niche. 

Having a youtube subscriber is now worth more than 50 dollars. So, try to make high-quality content, work on description SEO, and share as much as you can. These all help the videos get more views. 

The more views you get, the more people would click on the link you provided in the description. So, the chance of selling the products (whatever it is ) is higher. 

How to sell on social media (Facebook, Instagram, Pinterest)

Since social media becomes an inevitable part of every one living in a modern world, marketing has changed too. Now, social media is one of the greatest platforms ever to see any kind of products. From physical, digital, or even services.

Not only marketers can sell better and more on social media, but also many bloggers and businesses can promote their work through these social networks.

But how to use social media like Facebook, Instagram, Pinterest to get referrals or sell any products. It is not difficult but needs some techniques.

How to sell on Facebook?

You might know that Facebook and Instagram both have options to switch the account into a business one. So, you can use options on a business account like getting insight and statistics data about users following you. Or even, those who have visited your profile, like the number of profile visitors.

Though, there are some pros beside this option, like limited period to get statistics which is only past week. There are few social media management tools, that hope can get better insight to your business account.

So, to sell on Facebook you better have a Facebook business page which is free and you can easily set up in 7 steps as stated in the blog.

What you need to sell on Facebook?

Perquisite to sell on Facebook, and a detailed description would give for each of the perquisites.

1. Having a Facebook business page (better to sell on page than personal account)

The reason you should make a business page rather than selling on personal account is that, it is public and you can get unlimited followers. There is a section in a Facebook business page that shows the analytics of your page which helps growing your selling.

2. Having products: If you have already prepared your products, so that is fine. If not, and you can make it fast you can start from some affiliate programs available in the internet.

There are lots of website (clothing, perfumes, accessories, etc.) in which you can join their affiliate programs.

Refer users to that website and receive commission. To get started, it seems fine. Later one, once you could learn more, you can start your business by getting products in wholesale, or you offer your own services. Handicrafts are the products you can start even at home.

3. Having a website (or online store): Use iLink to make your online store brochure. Customers can easily choose from it and pay in any ways you choose. For example, they can contact you, pay to your PayPal, or any ways you prefer.

4. Add iLink URL in the Facebook page: You can easily with a few clicks add your online store to the Facebook page. Once, you uplod and share attractive pictures of products, visitors would click on the online store.

How to sell on Instagram?

The same method you have used for Facebook; you can use to sell on Instagram. However, having more followers on Instagram is possible, and it is not difficult. Here, I would mention some of ideas you can use to get more followers on Instagram, when you added iStore (online store) in Instagram bio.

To sell on Instagram:

  1. Make your products ready
  2. Build iStore on iLink website
  3. Add iStore in Instagram bio
  4. Attract more visitors and followers on Instagram

Tips to get more followers on Instagram:

1. Use Instagram automation tools like Instazood

In this way, you would install an app called Social bridge, or you can sign up to their system and run it manually. Both works well. The app will automatically like, follow, unfollow users on Instagram. This will enhance the profile visitors, and followers.

The more you get followers, the better you can sell on Instagram.

 2. Run a campaign to get more followers

In this way, you should share a post and ask users to like the posts, follow the account, and tag others in the comments.

So, you would give a price (according to your budget) and you will get engagement and followers in return.

3. Use video and photo editor’s tools available on the internet to make the content eye catchy. Remember, the first thing users would see is your content. Even on the Instagram feed of your account. so, if they find it attractive they would stay on your profile and see other things like your website and products.

How to sell on Pinterest?

Selling on Pinterest is a bit different from other two platforms of Facebook and Instagram. to sell on Pinterest you must have online store. So, the first thing is that you should build iStore, add your products ready there.

If you have still trouble getting ideas about what to sell on iStore, you can search the internet to get any ideas. I suggest you better start with buying in wholesale, make handicrafts, or start with available affiliate programs with high commission.

To sell on Pinterest:

  1. Make your products ready
  2. Build iStore
  3. Create content to share (note that image dimensions are important)
  4. Add iStore link to very content you share on Pinterest

All in all

Increasing sell on social media is easy using online store builder like iStore. At any age, with any budget, and any place you can sell on Facebook, Instagram, Pinterest using iStore.

How to hide and unhide Instagram tagged photos?

Instagram now has lots of features for all of its followers, as it is turn as the second-largest social media ver. However, some of its features sometimes get confusing or even disturbing. 

Instagram has provided an option for users to tag other users while sharing a post. This action made them able to show the posts to others or even used the option of being on their tagged section. 

However, some may not be comfortable with this and want to remove the tags. In opposite, some users are looking to have their tagged photos on their profile. In this blog, both methods are covered. 

Moreover, how does Instagram feed looks like when you are active on Instagram does matter? For example, while you are using Instagram growth service like the link in bio service, this action will automatically increase the profile visits. Therefore, having an amazing and clean Instagram feed can be vital to attracting more followers. 

How to hide Instagram tagged photos?

If you are running a personal or business account on Instagram, you might get tired of getting tagging notifications. As you know, anyone can tag you on Instagram if you do not turn the tagging off. 

So, if you see any photos on the tagging section of Instagram, every follower can see that. If you are uncomfortable to show them to others to get rid of them, you have two options: 

To hide the Instagram tagged photos: 

  1. Open the Instagram app and go to your profile. 
  2. Tap on tagging icon to see which photos are there 
  3. Open the photos you are going to remove your name or hide it from the profile
  4. Tap on the three-dot icon on the top right of the photo 
  5. Tap on “Hide from My Profile”

How to remove your name from Instagram tagged photos: You can remove your name from the images or hide the Instagram tagged photos. Both of these have the same instruction. In the end, you choose whether you want to remove your name or hide the images.

To remove your name from Instagram tagged photos:

  1. Open the Instagram app and go to your profile. 
  2. Tap on tagging icon to see which photos are there 
  3. Open the photos you are going to remove your name or hide it from the profile
  4. Tap on the three-dot icon on the top right of the photo 
  5. Tap on “Remove me from Post.”

How to unhide Instagram tagged photos: 

If you have some pending pictures and are going to unhide them, you should find them on the Tags section of your Instagram privacy. 

To unhide Instagram tagged photos: 

  1. Open the Instagram app and go to your profile. 
  2. Checked the tagged photos section by tapping on the icon to see if there are any photos over there
  3. Go to the three-line icon. 
  4. Tap on the “Setting.” 
  5. Go to the “Privacy.” 
  6. Tap on “Tags” 
  7. open the “Pending tags,” and you should see the number of the hidden photo just beside the menu.  
  8. Choose the photo you are going to unhide 
  9. there is a Three-dot icon on the top right of the photo, tap on it.  
  10. Choose “Post Options.” 
  11. Select “Show on my profile.” 
  12. Now, back to your Instagram profile by tapping the profile picture 
  13. Tap on the tagging section of the feed
  14. You should see the unhid tagged photos. You can unhide all other images one by one with this method. 

Unfortunately, you can not unhide all the photos in one place, unless you switch the manual tagging system off. in this case, all tagged photos will automatically appear on your Instagram feed.  

How to manually approve Instagram tagged photos: 

Instagram is given the option for all users to accept the photos they are tagged in manually. Though, to turn it off or on, you should go to the Instagram setting. 

To manually accept Instagram tagged photos: 

  1. Open the Instagram app and go to your profile. 
  2. Checked the tagged photos section by tapping on the icon to see if there are any photos over there
  3. Go to the three-line icon. 
  4. Tap on the “Setting.” 
  5. Go to the “Privacy.” 
  6. Tap on “Tags” 
  7. open the “Pending tags,” and you should see the number of the hidden photo just beside the menu.  
  8. Turn the status off, and from then now, all photos will automatically appear on your profile.  

If you have left any photos on the pending section, you should check them one by one and send them to your profile.

How to see who viewed your profile on Facebook?

Such this kind of question with the meaning of can you see who views your Facebook or things like that is more common among social media topics. Tortally, people are curious about their social media accounts and also keen to find more details about their Facebook stalkers to figure out what is happening around their social media platforms.

Though, knowing a lot brings more anxiety and state, and it is also true if you know how to see who views your Facebook profile and, as a result, get you nowhere.

Can you see who views your Facebook story?

Yes and no.

Facebook itself has announced in their article that there is no way to view the Facebook profile, and somehow it is true. There is no direct way on the Facebook app or even desktop to get notified when someone has viewed your Facebook profile. 

However, the answer can be yes, too, because the blueprint of someone who has viewed the profile will remain the page source. 

Now, here I am going to reveal the facts, whether real, can you see who looks at your Facebook or not? Why all of us want to get every small information from our different social media accounts? Sometimes it seems helpful for some specific activities such as like, follow, stories. 

It is our right, but something like checking who views our Facebook profile seems intriguing and strange. Is it help us to gain self-confidence or ruin our peace?

How to see who viewed your Facebook?

Indeed, you cannot directly see the name and profile picture of who has viewed your profile, but still there are some blueprint of those who have viewed your profile.

There are three methods to see who has viewed your Facebook:

  1. Viewing the page source 
  2. Chrome extension 
  3. A Facebook profile viewer tool 

Here I would explain all three methods, but I highly recommend don not share your password and username in any means that seem spammy. This action might face your device at risk of a virus attack. 

Method #1: Viewing the page source of a Facebook profile

Using “initialchatfriendslist”

  1. Go to www.Facebook.com and login to the account.
  2. Head to your profile page from the top right of the page.
  3. Right-Click on the page and choose “View page source” Press CTRL+F simultaneously to open the search bar.
  4. Type “initialchatfriendslist” to find the profile visitor’s Facebook IDs
  5. Now you will be directed to a section of the page source that you can see lots of numbers between “ “.
  6. These are the IDs of the people who viewed your profile the most. 

Using “Visitors”

Another way I learned through YouTube videos to find out who viewed my Facebook profile is to type the word “Visitors” in the page source document to get a list of your profile views.

To do this, follow all the same steps mentioned above for finding “initialchatfriendslist”.

After finding the word, you would see some ID numbers, which would most probably be the people who have viewed your Facebook profile recently. 

Method #2: Use Google Chrome extension (Social Profile extension)

  1. Head to the Social Profile extension page.
  2. Choose “Add to chrome” to have this extension on the google chrome browser
  3. Press “Add extension.” 
  4. Now go to www.Facebook.com and login to the account you are willing to check its profile viewers. 
  5. Now that you are on Facebook look at the timeline bar.
  6. You will notice the option “visitor” added there. 

Method #3: Profile visitor tool (Not recommended) 

If you search on the internet you would find many apps that offer viewing facebook profile. However, I would not recommend this apps as you should share your information with them. The issue is not sharing the information (as there are so many trustable apps across th e internet) but they might be spammy.

Method #4: Try public Facebook story

It is better you try facebook story in which you can directly see who has viewed it. However, to see who has viewed the profile you should make the story public. Then everyone would be able to see the story and you can check their profile too.

Why won’t Facebook let you see who views your profile?

Facebook announced that no one could track who viewed

your Facebook profile. But what you think? Is it right?

Well, According to Facebook policies, no one can access such private data about Facebook users. also added:” if If you come across an app that claims to offer this ability, please report the app.”

I mentiond the word “app” some third parties app claim that they can fetch the data about who exactly viewed your Facebook profile, but it is not the real way to see. These apps are known as unreliable apps. However, you can see the number of users who viewed your Facebook Page from an insight option. Insight is right at the top of the page, and Page view shows all the activities of your Facebook account, such as city and country, gender and age, as well as section. 

Ulanoff and Filho warn that there are some third parties apps shouldn’t be downloaded because of not only thread your security and privacy but also provide you with wrong data about who views your Facebook profile. The possibility of abusing your personal information like password goes up with trusting to these apps; in that case, they can sell this information to other third parties apps.

Facebook is worrying about its users’ mentality situations “We all look up friends, former friends, exes, and coworkers on Facebook, and we don’t want users to know when we look up their pages.” If this was possible, there is a chance people would spend less time on the site and thus hurt Facebook’s revenue, Dr. Selepak says. Based on this statement, we can conclude that more details about each social media can separate the people on social networks, and it won’t be necessary to make it known for all types of users. 

Sum up

We conclude that Facebook can track all your moves on its app from finding your location till reads your text messages and so it is a piece of cake for Facebook to recognize who views your Facebook profile. For the option, I said you could deny permissions, but for who viewed my Facebook you can do nothing.

How do Famous People Write their Bio on Instagram?

We all follow Hollywood celebrities on Instagram to get daily updates about their amazing life, right?

Let’s say we follow them to get hairstyle ideas, fashion ideas or just because they are too hot to be ignored. Even though we follow them, we don’t still know what their Instagram bio is, because we mainly just want to see what they are uploading.

I am pretty sure that even though millions of users follow them on Instagram, some have no clue what their favorite celebrity’s Instagram bio is.

No, no. You don’t have to go and check them now! J Here I save your time. I have listed the Instagram bios of Hollywood celebrities that you might want to see.

10 Famous people bios on Instagram

Here is the list of some of the famous users on Instagram with millions of followers and what they have written in their bio. Though, to get the newest number of followers and bio you can search their name on Instagram.

1.Chrissy Teigen (21.1 million followers)

” Chrissy Teigen | making America great again.”

She is such a nationalist girl, and her bio is just a famous sentence and a link to her site.

I think this would be enough information for someone as famous as her.

2.Marnie the dog (2 million followers)

“Marnie the dog | 17-year-old NYC Shih Tzu adopted from a shelter at age 11. I’m a lady! Adopt senior dogs?”

Marnie used her Instagram bio to inspire other people at first sight. You can always use an inspiring quote or your favorite motto which is relevant to your lifestyle and your Instagram account.

3.Leonardo DiCaprio (27 million followers)

“Actor and Environmentalist”

Leonardo doesn’t even need an introduction. He can get millions of followers without saying much in his bio. As you can see famous people use a brief bio on their Instagram following a link.

4.Nicole Scherzinger (3.6 million followers)

“Nicole Scherzinger | When you are born in a world you don’t fit in, it’s because you were born to help create a new one.”

Another inspiring Instagram bio. Nicole is known for her lovely motivational captions. So her bio must be inspiring too, right?

5.James Charles (10 million followers)

“James Charles | Unleash your inner artist ?”

He is a close friend of Kylie Jenner, so he must have something to do with makeup or arts. Lol, but as you can see he used an inspiring quote on his Instagram bio following the link to his youtube channel.

6.Taylor Swift (113 million followers)

“Taylor swift | it’s delicated.”

Taylor has 113 million followers on Instagram! This means she can use a great bio! But as you can see she has mentioned her latest song, and that’s all! Stories highlights are also something celebrities use on their Instagram bio.

7.Selena Gomez (144 million followers)

“Selena Gomez | Light, space, zest -that’s God. With him, on my side, I’m FEARLESS, afraid of no one and nothing. A21 global anti-human trafficking organization A21.org.”

Selena used her faith in God to write her bio on Instagram. This is so sweet. No wonder she has 144 million followers, right?

8.Amanda Cerny (23.3 million followers)

“Amanda Cerny | Actress -Queen of my own fantasy🌸& ur daily dose of happiness💎 @cernyfit @acerny2 #AmandaCerny 💛management@amandacerny.com”

A..manda has used the new Instagram bio feature; she mentioned her other Instagram accounts and her branded hashtag to direct visitors to her other channels. And also a link to her affiliate site.

9.Brent Rivera (10.8 million followers)

“Brent Rivera | Snap • TheBrentRivera Twitter • @BrentRivera biz • brentriverabiz@gmail.com.”

Brand Rivera is a talented social media comedian, so he wants to direct his followers to his other social media accounts.

10.The rock (121 million followers)

“The rock | Mana. Gratitude. Tequila. And not necessarily in that order.”

Everyone knows that the rock is awesome! He used a funny bio to show his lifestyle to followers with just a short link to his landing page.

Instagram bio tips

If you are looking to have an attractive Instagram bio you can use the following tips.

Use iLink landing page

A landing page is where you can add all your links. Since you cannot add more than one link to Instagram bio, so you can make a landing page and insert the URL in Instagram bio as website.

You can use a platform like iLink to convert your multiple links into one short link to use on your Instagram bio. This way you can drive traffic to more than one of your links and you do not have to change or update it all the time.

Instagram bio font

If you search the internet you can find so many tools to change the font of Instagram bio. It makes the bio more attractive and people may wonder how did you change that.

Instagram bio inspirational quotes

Another tip is using inspirational quotes (which you can get from the internet) to give the positive vibes to the visitors.

Sum up

So as you can see, celebrities don’t have to try too hard to get followers on Instagram.

  • Some of them use inspirational quotes to influence the world.
  • Many of them don’t even have a bio!
  • Some of them mention their other social accounts to promote their social accounts, or they just use a link to their website or a landing page full of links to their blogs, products,